IOS 連接 BLE+Arduino
介紹
一開始可以先看 Apple 官方 BLE 翻譯,對基本概念有個理解
IOS 主要使用 Core Bluetooth 框架來和藍芽裝置通訊,以下簡稱 CB
一般就是一個手機和一個藍牙來進行通訊,這兩個設備有另一個專有名詞
外接裝置(Peripheral = Server 端)和中心 (central = Client 端)
1 | Server = 藍芽裝置(HM-10) |
所謂 Server 端就是提供資料方,Client 端是接收資料方
當然如果你是兩台 iphone 使用 BLE 互傳資料
那手機就可同時為 Server 端或 Client 端,並非手機只能當 Client
Client 要讀取外接裝置的流程如下
1 | 設定 CBCentralManager -> 發現外接裝置 -> 發現服務(CServer) |
外接裝置的設定如下
1 | 設定 CBPeripheralManager -> 設定服務與特徵 -> 發布服務與特徵 -> 廣播服務 -> 發送資料 |
手機和 BLE 溝通時會用倒的方法
1 | // Rx (IOS裝置讀取外接裝置) |
安裝 Arduino IDE
如果找不到 port 按工具-> Get board info 重抓
BLE 模組(HM-10 CC2541)
CC2541 是晶片的型號,由 Texas Instrument 公司開發
HM-10 和 Arduino 接法如下 參考
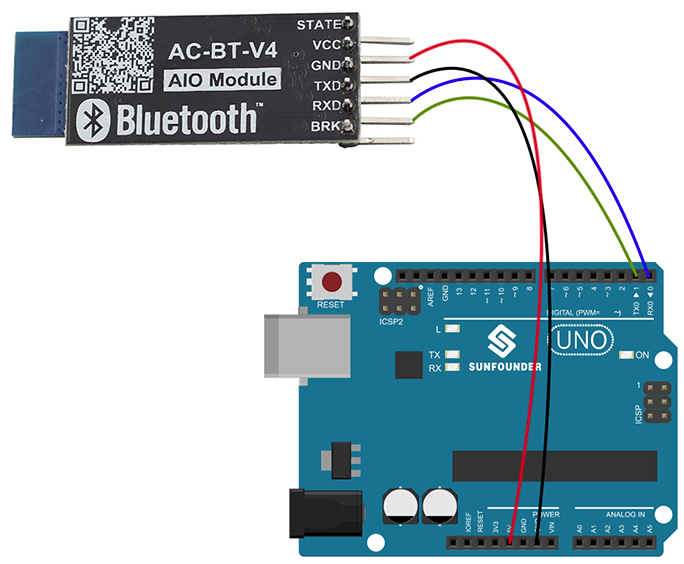
接好之後 HM-10 會閃爍紅燈,接著下載 App 測試是否能 Scan 到 HM-10
可以去 Appstore 下載 Bluetooth Smart Scanner 來掃描看看
要注意的是,上面 Arduino 的接法是直接接到 Arduino 板子上的 pin0(Rx) 和 pin1(Tx)
這樣接法在上傳 Arduino 檔案時會有問題,會出現 arduino stk500_recv(): programmer is not responding
記得先把 HM-10 Tx 和 Rx pin 拔掉再燒錄,或是改差 Arduino 的其他 pin (不使用 pin0 或 pin1 )
XCode 撰寫
手機要和使用外部 BLE 設備溝通的流程是 Discover、Connect、Explore、Interact

一開始介紹兩個類別 CBCentralManager 和 CBCentralManagerDelegate
CBCentralManager 管理手機 BLE 的連線狀態
CBCentralManagerDelegate 會負責監控手機 BLE 狀態是否發生改變
以上說的 BLE 狀態是指手機端喔,不是指 HM-10 的狀態
1 | var activeCentralManager : CBCentralManager? |
這邊把 delegate 設為自己,也就是說本身的 class 要繼承 CBCentralManagerDelegate
並且實作 CBCentralManagerDelegate 裡面的方法,而此 Delegate 要實作的方法如下
1 | centralManagerDidUpdateState(central: CBCentralManager) |
在此方法可以知道目前手機藍芽的狀態
1 | func centralManagerDidUpdateState(cManager: CBCentralManager) { |
當你手機有開啟藍芽功能時,執行此段程式會跑到 PoweredOn 的狀態
注意一定要用實機跑,simulator 目前還沒支援 BLE 功能
另外實體手機要 ip4 以上才有支援 BLE 功能
再來如果目前狀態為 PoweredOn,那我們就能開啟手機藍牙搜尋功能(scan),程式加入以下片段
另外也要注意一點,一定要先確認 PoweredOn 狀態才能開啟 scanForPeripheralsWithServices
直接開啟 scanForPeripheralsWithServices 是沒用的
1 | func centralManagerDidUpdateState(cManager: CBCentralManager) { |
再來要說的是 scanForPeripheralsWithServices(nil, options: nil) 的參數
第一個參數是 ServiceUUID,如果你填 nil 那手機就會掃描所有可以用的外部設備
你可以先把 ServiceUUID 當作是一個特定的設備 id,例如假設我們只想掃到 HM-10,不想掃到其他外部設備
而 HM-10 預設的 ServiceUUID 是 0xFFE0,就可以改寫為
1 | let serviceUUID = [CBUUID(string: "0xFFE0")] |
其他
目前使用 UITableViewController 協定後,就不需要在寫 UITableViewDelegate, UITableViewDataSource
1 | (O) class BleTblVwCtrl: UITableViewController, UITableViewDelegate, UITableViewDataSource |