Memory Pool C 實作

基本介紹

C 在 run time 期間可以使用 malloc 來動態取得記憶體

1
2
3
4
5
6
7
8
9
10
#define N 10000
int main()
{
int* p = malloc(sizeof(int)); //allocate a pointer to an integer
int* pa = malloc(sizeof(int) * N); //allocate an array with N integers
/*statement*/
free(p);
free(pa);
return 0;
}

不過當程式執行時,如果一直反覆 malloc 和 free 記憶體區塊。

會導致記憶體的碎片問題,碎片一多可使用的記憶體就變少

最後產生 memory leak,而 memory pool 的想法是

預先就 alloc 一個大的記憶體區塊,而程式在 run time 期間

就只會對此區塊的記憶體做分配 (allocate)、使用 (access)、歸還 (free)

這樣就不會有記憶體破碎的問題

參考

參考

Struct Align

基本介紹

C 以變數類型配置記憶體空間,常見類型及大小如下

1
2
3
4
5
6
7
8
9
char 	        1 byte 	        -128 to 127 or 0 to 255
unsigned char 1 byte 0 to 255
signed char 1 byte -128 to 127
int 2 or 4 bytes -32,768 to 32,767 or -2,147,483,648 to 2,147,483,647
unsigned int 2 or 4 bytes 0 to 65,535 or 0 to 4,294,967,295
short 2 bytes -32,768 to 32,767
unsigned short 2 bytes 0 to 65,535
long 4 bytes -2,147,483,648 to 2,147,483,647
unsigned long 4 bytes 0 to 4,294,967,295

32 bits 的架構上,一次的資料存取也就是32 bits (4bytes)

4 bytes 不是隨便從哪個點抓都可以,而是以4 bytes 為單位

比如說第 0,4,8 ,12….等,而不會是從3,7,9 開始

這表示了對齊 (alignment)的重要,因為會影響到幾次才抓的完。

如果要抓一個4 bytes 的int,而這個int是從 6 擺到 10,那就表示要抓兩次

因為會先 (4),5,6,7 再來 (8),9,10,11,範例

How to program C〈結構、Union、Bit、列舉〉

基本介紹

結構定義如下,定義結構不會佔用記憶體

他只是建立一種新的類型,就像int一樣

1
2
3
4
5
6
7
8
struct player{
char name[20];
/*
不可以包含自己,只能用指標
struct player person;
*/
struct player *personPtr;
};

宣告變數如下

1
2
3
4
5
6
struct a, b[20], *c;

或是直接和定義寫在一起
struct card{
char name[20];
} a, b[20], *c;

How to program C〈字元與字串〉

基本介紹

字元是程式的基本元素,每一段程式都是由字元組成而來

字元常數(char constant)是由單引號括起的字元

他也代表一個int的值,字串及一連串的字元

字串可包含字母、數字、或特殊符號(+,-,*,/,$)

字串是由雙引號括起的

C 的字串是以 NULL('\0')為結束的字元陣列

注意

1
2
3
字串是指標
字元是整數(0-255)
所以如果方法參數要字元,要宣告為 func(int c);

字串宣告有兩種

1
2
3
4
5
6
7
8
9
10
11
12
13
14
15
16
17
18
19
20
21
22
23
24
25
26
// 字串即陣列
char color[] = "blue";
char color[] = {'b','l','u','e','\0'};
const char *colorPtr = "blue";

// 動態建立陣列
int size = 10;
int i = 0;
int *arr = malloc(size * sizeof(int));
memset(arr, 0, sizeof(int) * size);

printf("顯示元素值:\n");
for(i = 0; i < size; i++) {
printf("arr[%d] = %d\n", i, *(arr+i));
}

printf("指定元素值:\n");
for(i = 0; i < size; i++) {
arr[i] = i*10;
}

printf("顯示元素值:\n");
for(i = 0; i < size; i++) {
printf("arr[%d] = %d\n", i, *(arr+i));
}
free(arr);

PHY 管理簡介

PHY Interface

管理 PHY Interface 可使用 MII 或 MDIO(Management Data Input/Output)

1
2
10G 以下 MII  (IEEE802.3 Clause22)
10G 以上 MDIO (IEEE802.3 Clause45)

1G 以下的 PHY 較簡單,MAC 透過 MII 管理 PHY 的 REG (只有標準的 32 個)

10G 以上的 PHY 較複雜,MAC 透過 MDIO 管理 PHY 的 REG

10G 以上的 PHY 還會分層,對應各自的 MMD Device(MDIOManageableDevice)

需要使用 Clause45 的 MDIO 來管理

MAC 屬於 data link,PHY 屬於 Physcial

程式設計師的自我修養〈目的檔〉

目的檔格式

可執行檔格式(Executable)

1
2
3
4
5
Windows : PE  (Portable Executable)
Linux : ELF (Executable Linkable Format)
Intel : OMF (Object Module Format)
Unix : .out
DOS : .COM

以上都是 COFF(Common object file format) 格式的變化

動態連結程式庫

1
2
Windows : .dll
Linux : .so

靜態連結程式庫

1
2
Windows : .lib
Linux : .a

動態/靜態連結程式庫也是按照可執行檔格式儲存

程式設計師的自我修養〈編譯和連結〉

Hello World

1
2
3
4
5
6
7
#include <stdio.h>

int main()
{

printf("Hello World\n");
return 0;
}

編譯一個最簡單的 Hello World 檔案指令為

1
2
3
$ gcc hello.c
$ ./a.out
$ Hello World

編譯過程分為 4 個步驟

1
2
3
4
1.前置處理 = 預處理 = 前編譯 (Preprocessing)
2.編譯 (Compilation)
3.組譯 (Assemby)
4.連結 (Linking)

IOS 連接 BLE+Arduino

介紹

Apple 官方 BLE 翻譯

書籍參考

一開始可以先看 Apple 官方 BLE 翻譯,對基本概念有個理解

IOS 主要使用 Core Bluetooth 框架來和藍芽裝置通訊,以下簡稱 CB

一般就是一個手機和一個藍牙來進行通訊,這兩個設備有另一個專有名詞

外接裝置(Peripheral = Server 端)和中心 (central = Client 端)

1
2
Server = 藍芽裝置(HM-10)
Client = IOS 裝置(手機)

所謂 Server 端就是提供資料方,Client 端是接收資料方

當然如果你是兩台 iphone 使用 BLE 互傳資料

那手機就可同時為 Server 端或 Client 端,並非手機只能當 Client

Client 要讀取外接裝置的流程如下

1
2
設定 CBCentralManager -> 發現外接裝置 -> 發現服務(CServer) 
-> 發現特徵(CBCharateristic) -> 訂閱特徵 -> 讀取資料(Rx)

外接裝置的設定如下

1
設定 CBPeripheralManager -> 設定服務與特徵 -> 發布服務與特徵 -> 廣播服務 -> 發送資料

手機和 BLE 溝通時會用倒的方法

1
2
3
4
5
6
7
// Rx (IOS裝置讀取外接裝置)
func peripheral(peripheral: CBPeripheral?, didUpdateValueForCharacteristic
characteristic: CBCharacteristic?, error: NSError!)


// Tx (IOS裝置傳送外接裝置)
func peripheralDevice.writeValue(data, forCharacteristic: deviceCharacteristics,
type: CBCharacteristicWriteType.WithoutResponse)

安裝 Arduino IDE

參考 參考

參考 參考

如果找不到 port 按工具-> Get board info 重抓

BLE 模組(HM-10 CC2541)

DataSheet 英文

DataSheet 中文

教學參考

CC2541 是晶片的型號,由 Texas Instrument 公司開發

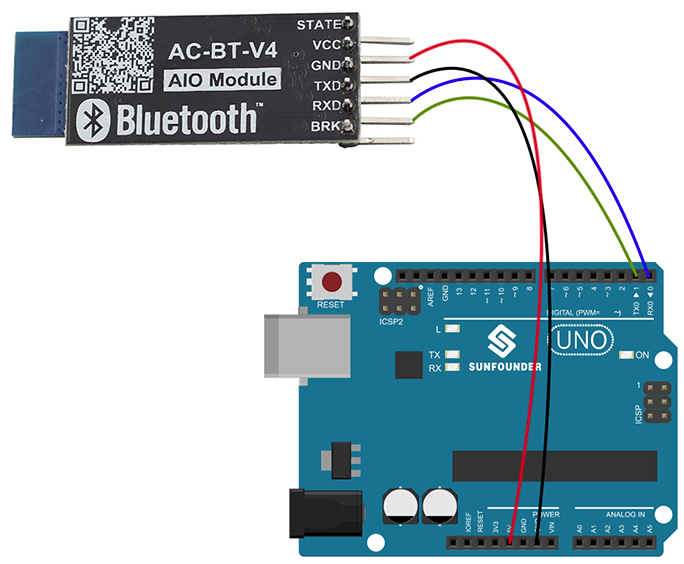
HM-10 和 Arduino 接法如下 參考

160906-0001.png

接好之後 HM-10 會閃爍紅燈,接著下載 App 測試是否能 Scan 到 HM-10

可以去 Appstore 下載 Bluetooth Smart Scanner 來掃描看看

要注意的是,上面 Arduino 的接法是直接接到 Arduino 板子上的 pin0(Rx) 和 pin1(Tx)

這樣接法在上傳 Arduino 檔案時會有問題,會出現 arduino stk500_recv(): programmer is not responding

記得先把 HM-10 Tx 和 Rx pin 拔掉再燒錄,或是改差 Arduino 的其他 pin (不使用 pin0 或 pin1 )

XCode 撰寫

參考

手機要和使用外部 BLE 設備溝通的流程是 Discover、Connect、Explore、Interact

參考

一開始介紹兩個類別 CBCentralManager 和 CBCentralManagerDelegate

CBCentralManager 管理手機 BLE 的連線狀態

CBCentralManagerDelegate 會負責監控手機 BLE 狀態是否發生改變

以上說的 BLE 狀態是指手機端喔,不是指 HM-10 的狀態

1
2
3
var activeCentralManager : CBCentralManager?
...
activeCentralManager = CBCentralManager(delegate: self, queue: nil)

這邊把 delegate 設為自己,也就是說本身的 class 要繼承 CBCentralManagerDelegate

並且實作 CBCentralManagerDelegate 裡面的方法,而此 Delegate 要實作的方法如下

1
centralManagerDidUpdateState(central: CBCentralManager)

在此方法可以知道目前手機藍芽的狀態

1
2
3
4
5
6
7
8
9
10
11
12
13
14
15
16
17
18
19
20
21
22
func centralManagerDidUpdateState(cManager: CBCentralManager) {
// 顯示狀態
switch (cManager.state) {
case CBCentralManagerState.Unknown:
UDebug.DLog("Unknown")

case CBCentralManagerState.Unsupported:
UDebug.DLog("Unsupported")

case CBCentralManagerState.Unauthorized:
UDebug.DLog("Unauthorized")

case CBCentralManagerState.Resetting:
UDebug.DLog("Resetting")

case CBCentralManagerState.PoweredOff:
UDebug.DLog("PoweredOff")

case CBCentralManagerState.PoweredOn:
UDebug.DLog("PoweredOn")
}
}

當你手機有開啟藍芽功能時,執行此段程式會跑到 PoweredOn 的狀態

注意一定要用實機跑,simulator 目前還沒支援 BLE 功能

另外實體手機要 ip4 以上才有支援 BLE 功能

再來如果目前狀態為 PoweredOn,那我們就能開啟手機藍牙搜尋功能(scan),程式加入以下片段

另外也要注意一點,一定要先確認 PoweredOn 狀態才能開啟 scanForPeripheralsWithServices

直接開啟 scanForPeripheralsWithServices 是沒用的

1
2
3
4
5
6
7
8
9
10
11
12
13
14
15
16
17
18
func centralManagerDidUpdateState(cManager: CBCentralManager) {

// 顯示狀態
switch (cManager.state) {
case CBCentralManagerState.Unknown:
UDebug.DLog("Unknown")
// 省略......
}


// 如果狀態為 PoweredOn,開啟 BLE 搜尋功能
if cManager.state == CBCentralManagerState.PoweredOn {
cManager.scanForPeripheralsWithServices(nil, options: nil)
UDebug.DLog("開始搜尋外部 BLE 裝置")
} else {
UDebug.DLog("請先將手機藍牙打開")
}
}

再來要說的是 scanForPeripheralsWithServices(nil, options: nil) 的參數

第一個參數是 ServiceUUID,如果你填 nil 那手機就會掃描所有可以用的外部設備

你可以先把 ServiceUUID 當作是一個特定的設備 id,例如假設我們只想掃到 HM-10,不想掃到其他外部設備

而 HM-10 預設的 ServiceUUID 是 0xFFE0,就可以改寫為

1
2
3
4
5
6
7
8
9
let serviceUUID = [CBUUID(string: "0xFFE0")]

// 如果狀態為 PoweredOn,開啟 BLE 搜尋功能
if cManager.state == CBCentralManagerState.PoweredOn {
cManager.scanForPeripheralsWithServices(serviceUUID, options: nil)
UDebug.DLog("開始搜尋外部 BLE 裝置")
} else {
UDebug.DLog("請先將手機藍牙打開")
}

其他

目前使用 UITableViewController 協定後,就不需要在寫 UITableViewDelegate, UITableViewDataSource

1
2
(O) class BleTblVwCtrl: UITableViewController, UITableViewDelegate, UITableViewDataSource 
(X) class BleTblVwCtrl: UITableViewController

程式設計師的自我修養〈介紹〉

程式設計師的自我修養心得筆記

Hello World

電腦架構 : CPU / Memory / IO 設備

目前 CPU 最高頻率為 4GHz,已經達到實體限制

API = Application Programming Interface

Linux API : Glibs -> POSIX

Window API : Win32

磁碟讀取

8000 byte file

0 - 4096 byte -> 1000 - 1007 sector (every sector 512 byte ; 8*512 = 4096 byte )

4097 - 8000 byte -> 2000 - 2007 sector (every sector 512 byte ; 8*512 = 4096 byte )

ext3 -> 1000 - 1007 -> 2000 - 2007 用鏈結串列當作檔案儲存裝置

IDE0 的 I/O = 0x1F0 - 0X1F7 & 0x376 - 0x377

如果要讀取 1000 的 LBA 開始的 8 個 sector

1
2
3
4
5
6
7
8
9
10
11
12
13
14
15
16
17
18
0x1F3 - 0X1F6 的 4 byte 為 LBA 位址
LBA 1000 位址 = 0x3E8
0x1F3 = 0x00 (1 Byte)
0x1F4 = 0x00 (1 Byte)
0x1F5 = 0x03 (1 Byte)
0x1F6 = 0xE8 (1 Byte)

0x1F2 為要讀取幾個 sector,要讀取 8 個所以寫 8
0x1F7 為操作的動作,讀取動作是 0x20


完整指令是
out 0x1F3, 0x00
out 0x1F4, 0x00
out 0x1F5, 0x03
out 0x1F6, 0xE8
out 0x1F2, 0x08
out 0x1F7, 0x20

利用 GPIO 計算程式時間